This chapter introduces the applied technique using Adobe Illustrator*
For people familiar to drawing freehand on paper, Illustrator is a kind of software difficult to approach. But if you master it, you'll be able to use various handy techniques.
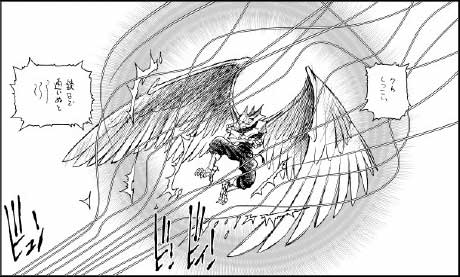
The above figure is the crest of the space tank that appeared in BAA LastOrder the 22nd (PHASE: 21 in comics).
Symmetrical marks like this are troublesome to draw by hand, but Illustrator is good at those types of figures. Save the image as a separate file at first, then in Photoshop, open it to change a bitmap*, which you can transform, copy & paste, and so on. It is ordinary usage so far.
|
Now, I will show you explain how to create DO-SEN (move lines)* using the art brush feature of Illustrator.
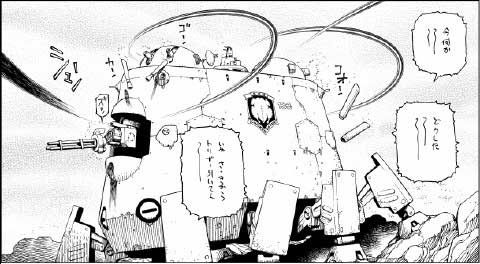
The move line of the above figure was made by this method. Curves and ellipses with long strokes are troublesome even for skilled assistants to draw finely. But when using the technique, you can draw well no matter how long strokes are, or how irregular curves are.
|
First, create a base move line in Illustrator.

Use an Ellipse tool to make an oblong ellipse on a new document. Select black for "Fill color" and none for "Stroke color".

Next, select Convert Anchor Point Tool, click the anchor points of the right and left of the ellipse, and make both an acute angle.
|

Select it again with Selection Tool, and drag to narrow the frames of the upper and lower sides of the Bounding Box. This means width of one line. If it is difficult to control with the Bounding Box, double-click Scale Tool to open up the options, check "Non-Uniform" and put an arbitrary numerical value in the "Vertical" box to transform it.

From one line made in this way, you can duplicate lines and adjust length or something to make a shape of the basic form of move lines. The above figure is a partial expansion of the basic form of a move line. Between lines, a 100% white shape was laid out, serving as a correction fluid for outlined white stuff. At this example, the lines were widened at mid portions with Envelope Distort as well. Group them and save as the Illustrator format under some name. Since the result of the basic form here influences the quality of the finish, it is desirable that we spend enough time to make them when not working under deadline pressure.
|
Now, let's arrange them in an actual manuscript. Newly with Illustrator, open the draft that had been saved at 72 dpi.

Lock the layer on which the draft is arranged and create a new layer.
|
Drag and arrange the basic form of the move line, then adjust the Bounding Box so that the width of the whole move line matches your intention.
With the basic form of the move line selected, click the triangle at the upper right of the brush palette to open a menu, and select a "New Brush" there.
A dialog shown above pops up, so check "New Art Brush."
Then, another dialog shown above, named Art Brush Options, pops up. Usually it's ok in the default setup, but when dealing with an asymmetric shape, direction of the arrows in "Direction" and the order of drawing for the path to be applied will have some meaning. However, you can click OK button without considering because you can modify it afterwards. Then, the basic form of the move line you've just added now should be displayed on the Brush Palette. You can delete the basic form of the move line on the layer now.
|
While looking at the draft, draw paths that will become guides for applying with Pen Tool etc.
In the above figure, the draft is not displayed in order to make the paths easy to see.
With the paths selected, click the basic form of the move line on the Brush Palette. Then, the move lines appear, with smoothly transformed along with the paths. When the asymmetric basic form of the move line appeared with wrong direction, double-click the basic form of the move line on the Brush Palette to open "Art Brush Options" dialog, then change arrows in "Direction" and click OK. If it asks "The brush is being used. Create a new brush?," just click "Apply" button.
You don't need the draft any more, so delete the whole layer and save the move line as the Illustrator format under another name.
|
Move to Photoshop and open the move line file made by Illustrator.
Then a dialog named "Rasterize Generic PDF Format," shown in the above figure, pops up. Here, leave Width and Height, set 600 dpi resolution, select Grayscale Mode, uncheck Anti-aliased, check Constrain Propotions, and click OK. After rasterizing, the bitmapped move line image, arranged on a transparent layer, is displayed. As the size of the lines were based on that of the draft, when you copy and paste them to arrange on the work file, still the sizes must match..
The lines of ballistic trajectory shown in the example above were made by the same method. Although the first process to create a basic form takes time, it will be laborsaving in the long run because the data can be reused. If using it appropriately, you will be able to make lines more smoothly and finely than hand-drawn ones. If you save them as a separate layer, modifying them afterward is easy as well. However, that doesn't mean I use this method to create all of move lines in BAA LastOrder -- about 20 to 30 percent of them were hand-drawn by my assistant. When we can draw them faster by hand, or when delicate nuance is required, we resort to drawing by hand. It is important to understand strong points and weak points of each technique and to use them appropriately as occasion demands.
By Yukito Kishiro
|
